3. Running Jobs on the HPC
Since EOS HPC is a shared system, all computations must be carried out through a queue. Users submit jobs to the queue and the jobs then run when it’s their turn. To handle different workloads, jobs can be submitted to one or more partitions, which are essentially queues that have been assigned certain restrictions such as the maximum running time.
The queueing system used at EOS is Slurm. Users that are familiar with Sun Grid Engine (SGE) or Portable Batch System (PBS), will find Slurm very familiar.
Note
A node can be shared by multiple users, so you should always take extra care in requesting to correct amount of resources (nodes, cores and memory). There is no reason to occupy an entire node if you are only using a single core and a few gigabytes of memory. Always make sure to use the resources on the requested nodes efficiently.
To get an overview of the available partitions:
[myuser@headnode1]$ sinfo
This will list each partition and all of the compute nodes assigned to each partition and the maximum walltime (running time) a job in the partition can have.
By typing a slightly different command:
[myuser@headnode1]$ sinfo -N --long
All nodes will be listed and all partitions they belong to, together with the available resources such as the number of cores per node, available memory per node.
The queueing system allows us to either submit an interactive or batch job. In the following sections we explain both methods.
3.1. Interactive jobs
An interactive job effectively gives you a shell on a compute node so that you can type commands and run programs that will run on that node. This is great for experimenting and debugging problems.
Warning
While interactive jobs are useful, they require you to be logged in to the node while your computations one the node are running. Exiting the session will cancel your computations, which is not usually what you want. Also, you may want to run many jobs on multiple nodes, and having that many interactive sessions open quickly becomes impossible to manage. We recommend running interactive jobs only for exploring your data, or for those analyses (for example in R through RStudio) that require brief computations and decisions or coding of the next steps based on the immediate inspection of the results.
To submit an interactive job:
[myuser@headnode1]$ srun --pty /bin/bash
srun: job 17129453 queued and waiting for resources
srun: job 17129453 has been allocated resources
[b1s3]$
This may take some time since you must wait until it’s your turn in the queue. Once it’s your turn, you’ll get a shell on the node that was assigned to you. In this case, we were given the node b1s3.
You may also specify some requirements for the job, such as the amount of memory that should be allocated:
[myuser@headnode1]$ srun --mem=16g --pty /bin/bash
When running a job you have access to the same filesystems as when running on the frontend. Thus, you can access your home folder and project folders with the same paths as on myuser@headnode1.
When you’re done with your interactive session on the node, it can be exited by running the exit command or pressing Control + D:
[b1s3]$ exit
[myuser@headnode1]$
You’ll now be back on the frontend.
3.2. Batch jobs
Batch jobs are best suited for computations lasting longer or resource demanding analyses. Batch jobs are submitted to the queue like interactive jobs, but they don’t give you a shell to run commands. Instead, you must write a job script which contains the commands that needs to be run.
A job script looks like this:
#!/bin/bash
#SBATCH --partition WORK
#SBATCH -D /my/working/directory
#SBATCH -c 1
#SBATCH --mem 4G
#SBATCH -t 02:00:00

echo hello world > result.txt
The lines beginning with #SBATCH communicate to Slurm which parameters we want to set for a specific task, or what kind of resources we want to be reserved for that particular analysis. The job script specifies which resources are needed as well as the commands to be run.
Line 2 specifies that this job should be submitted to the normal partition.
Line 3 tells the scheduler that on execution should go (or chdir) to a specific folder where we want the analysis to be performed.
Line 4 specifies that we want a single core to run on, and line 5 specifies that we want 4G of memory per allocated core.
Finally, line 5 indicates we are reserving 2 hours to execute this script.
Warning
At the moment (issue under investigation) all three of –mem, -t and -D need to be specified in the job script, to make sure the job is scheduled in the correct way and your work is distributed as much as possible across all available resources.
See the table below for an overview of commonly used resource flags:
Short Flag | Long Flag |
Description |
||
|---|---|---|---|
-A |
–account |
Account to submit the job under. |
|
-p |
–partition |
One or more comma-separated partitions that the job may run on. |
|
-c |
–cpus-per-task |
Number of cores allocated for the job. All cores will be on the same node. |
|
-n |
–ntasks |
Number of cores allocated for the job. Cores may be allocated on different nodes. |
|
-N |
–nodes |
Number of nodes allocated for the job. Can be combined with -n and -c. |
|
-t |
–time |
Maximum time the job will be allowed to run. |
|
–mem |
Memory limit per compute node for the job. Do not use with mem-per-cpu flag. |
||
–mem-per-cpu |
Memory allocated per allocated CPU core. |
||
The rest of the script is a normal Bash script which contains the commands that should be executed, when the job is started by Slurm.
To submit a job for this script, save it to a file (e.g. example.sh) and run:
[myuser@headnode1]$ sbatch example.sh
Submitted batch job 17129500
[myuser@headnode1]$
Contrary to srun, this command returns immediately, giving us a job id to identify our job.
3.3. Checking job status
To check the status of a job:
[myuser@headnode1]$ squeue -j 17129500
To check the status of all of your submitted jobs:
[myuser@headnode1]$ squeue -u USERNAME
You can also omit the username flag to get an overview of all jobs that have been submitted to the queue:
[myuser@headnode1]$ squeue
3.4. Cancelling a job
Jobs can be cancelled using the scancel command:
[myuser@headnode1]$ scancel 17129500
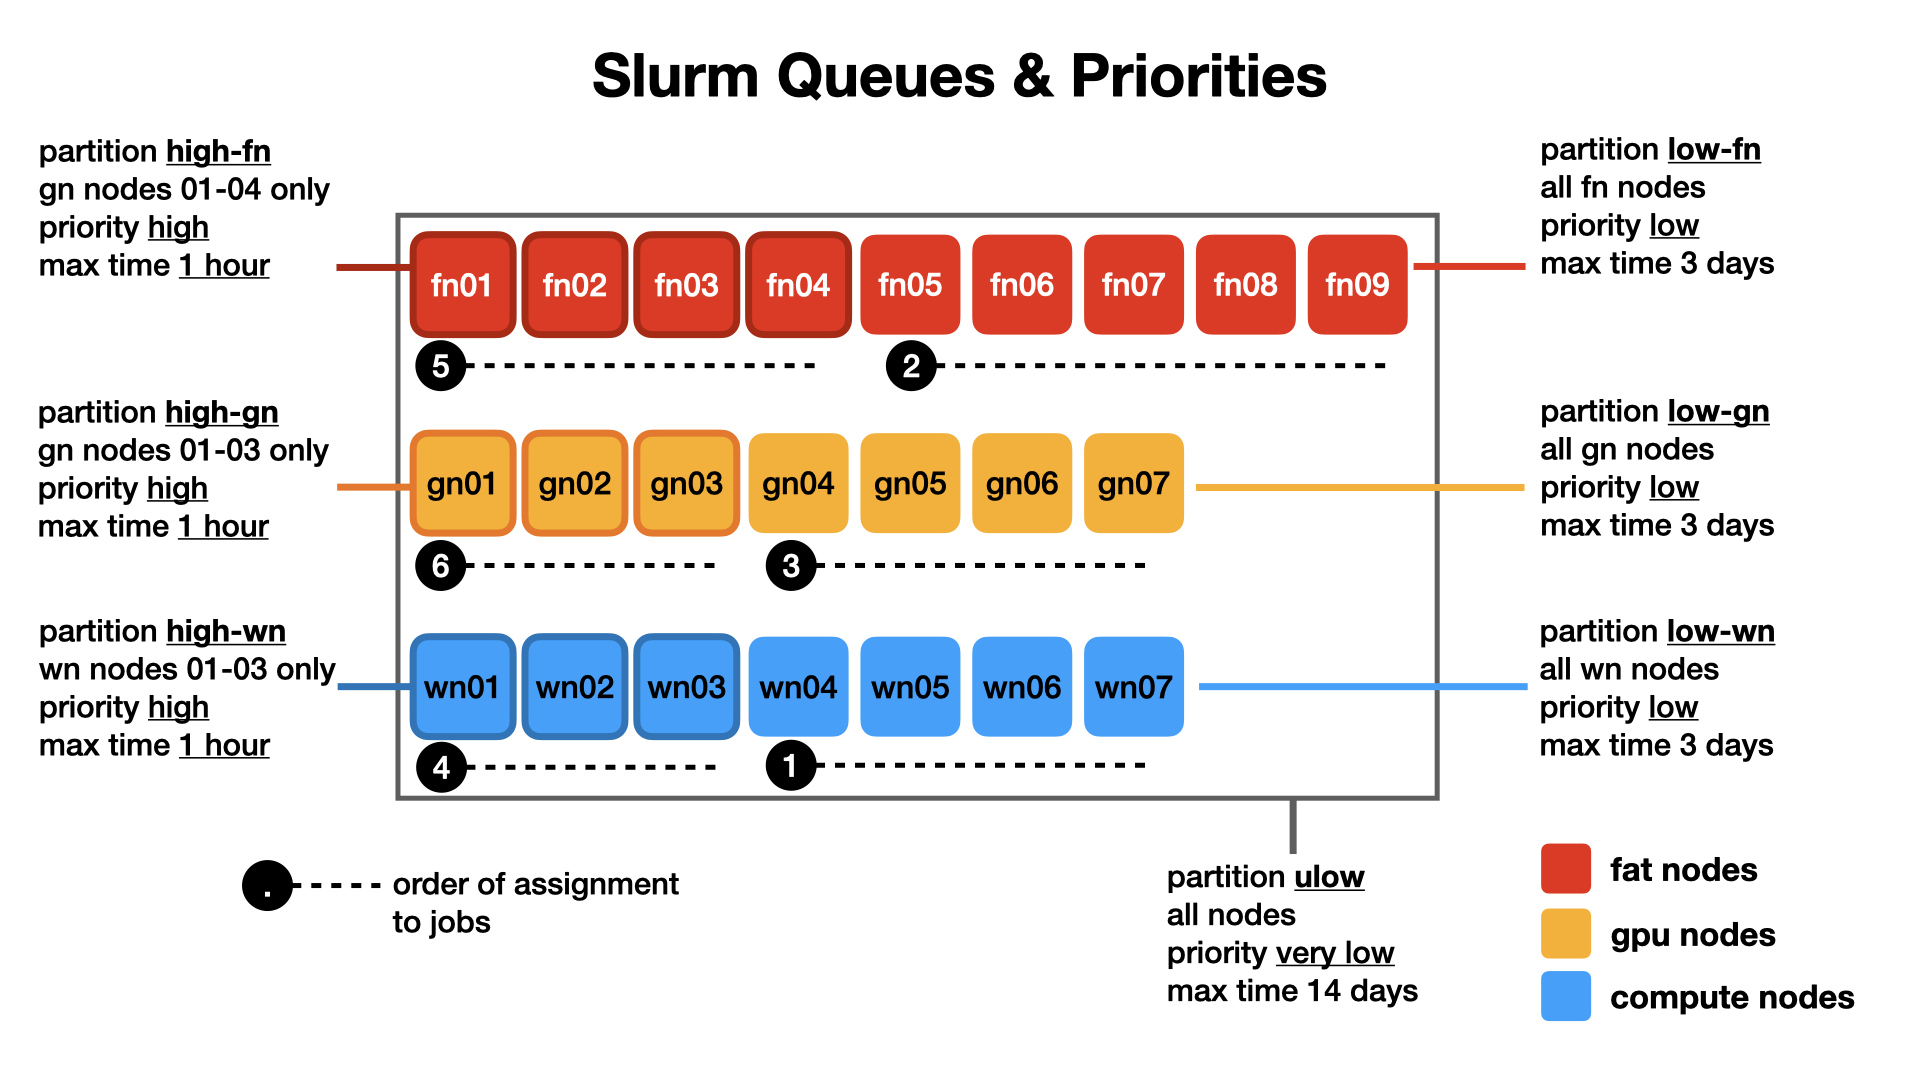
3.5. Slurm Queues and Priorities
Jobs will be placed by default in the priority queue ulow unless a different queue is requested explicitly (option -p queuename) during the job submission. The order of assignments of the jobs to the node is designed to maximise the chance high-priority jobs have to run.
Warning
Bear in mind: queues assigning more priority while reducing potential time-to-run also restrict the nodes the jobs can be assigned to and the maximum duration of the job.
A higher priority corresponds to a shorter maximum duration of the job.
Be aware of this when requesting a specific queue.
The queue system and the order of assignments to nodes is represented in the figure below: